Cashier Guide
Understand waiter-created bills
Before you begin
Confirm the tenant, signed-in identity, configured outlet, table, and waiter. Know which payment methods and exception actions are authorized by your site.
The OUTLET control may be visible even when your cashier role cannot change it. If the configured outlet is wrong, stop and escalate rather than attempting to work around the permission warning.
Steps
Waiters normally create a customer bill from the KOT start screen → BILLING. They may combine selected quantities from several orders on the same table, then save the bill. Before accepting payment, the cashier must open that saved bill and verify its ID, waiter, items, quantities, amount, and unpaid balance.
Expected result
The chosen order quantities are represented on one saved bill. Unbilled quantities remain associated with the table and can be billed later.
Review a saved bill
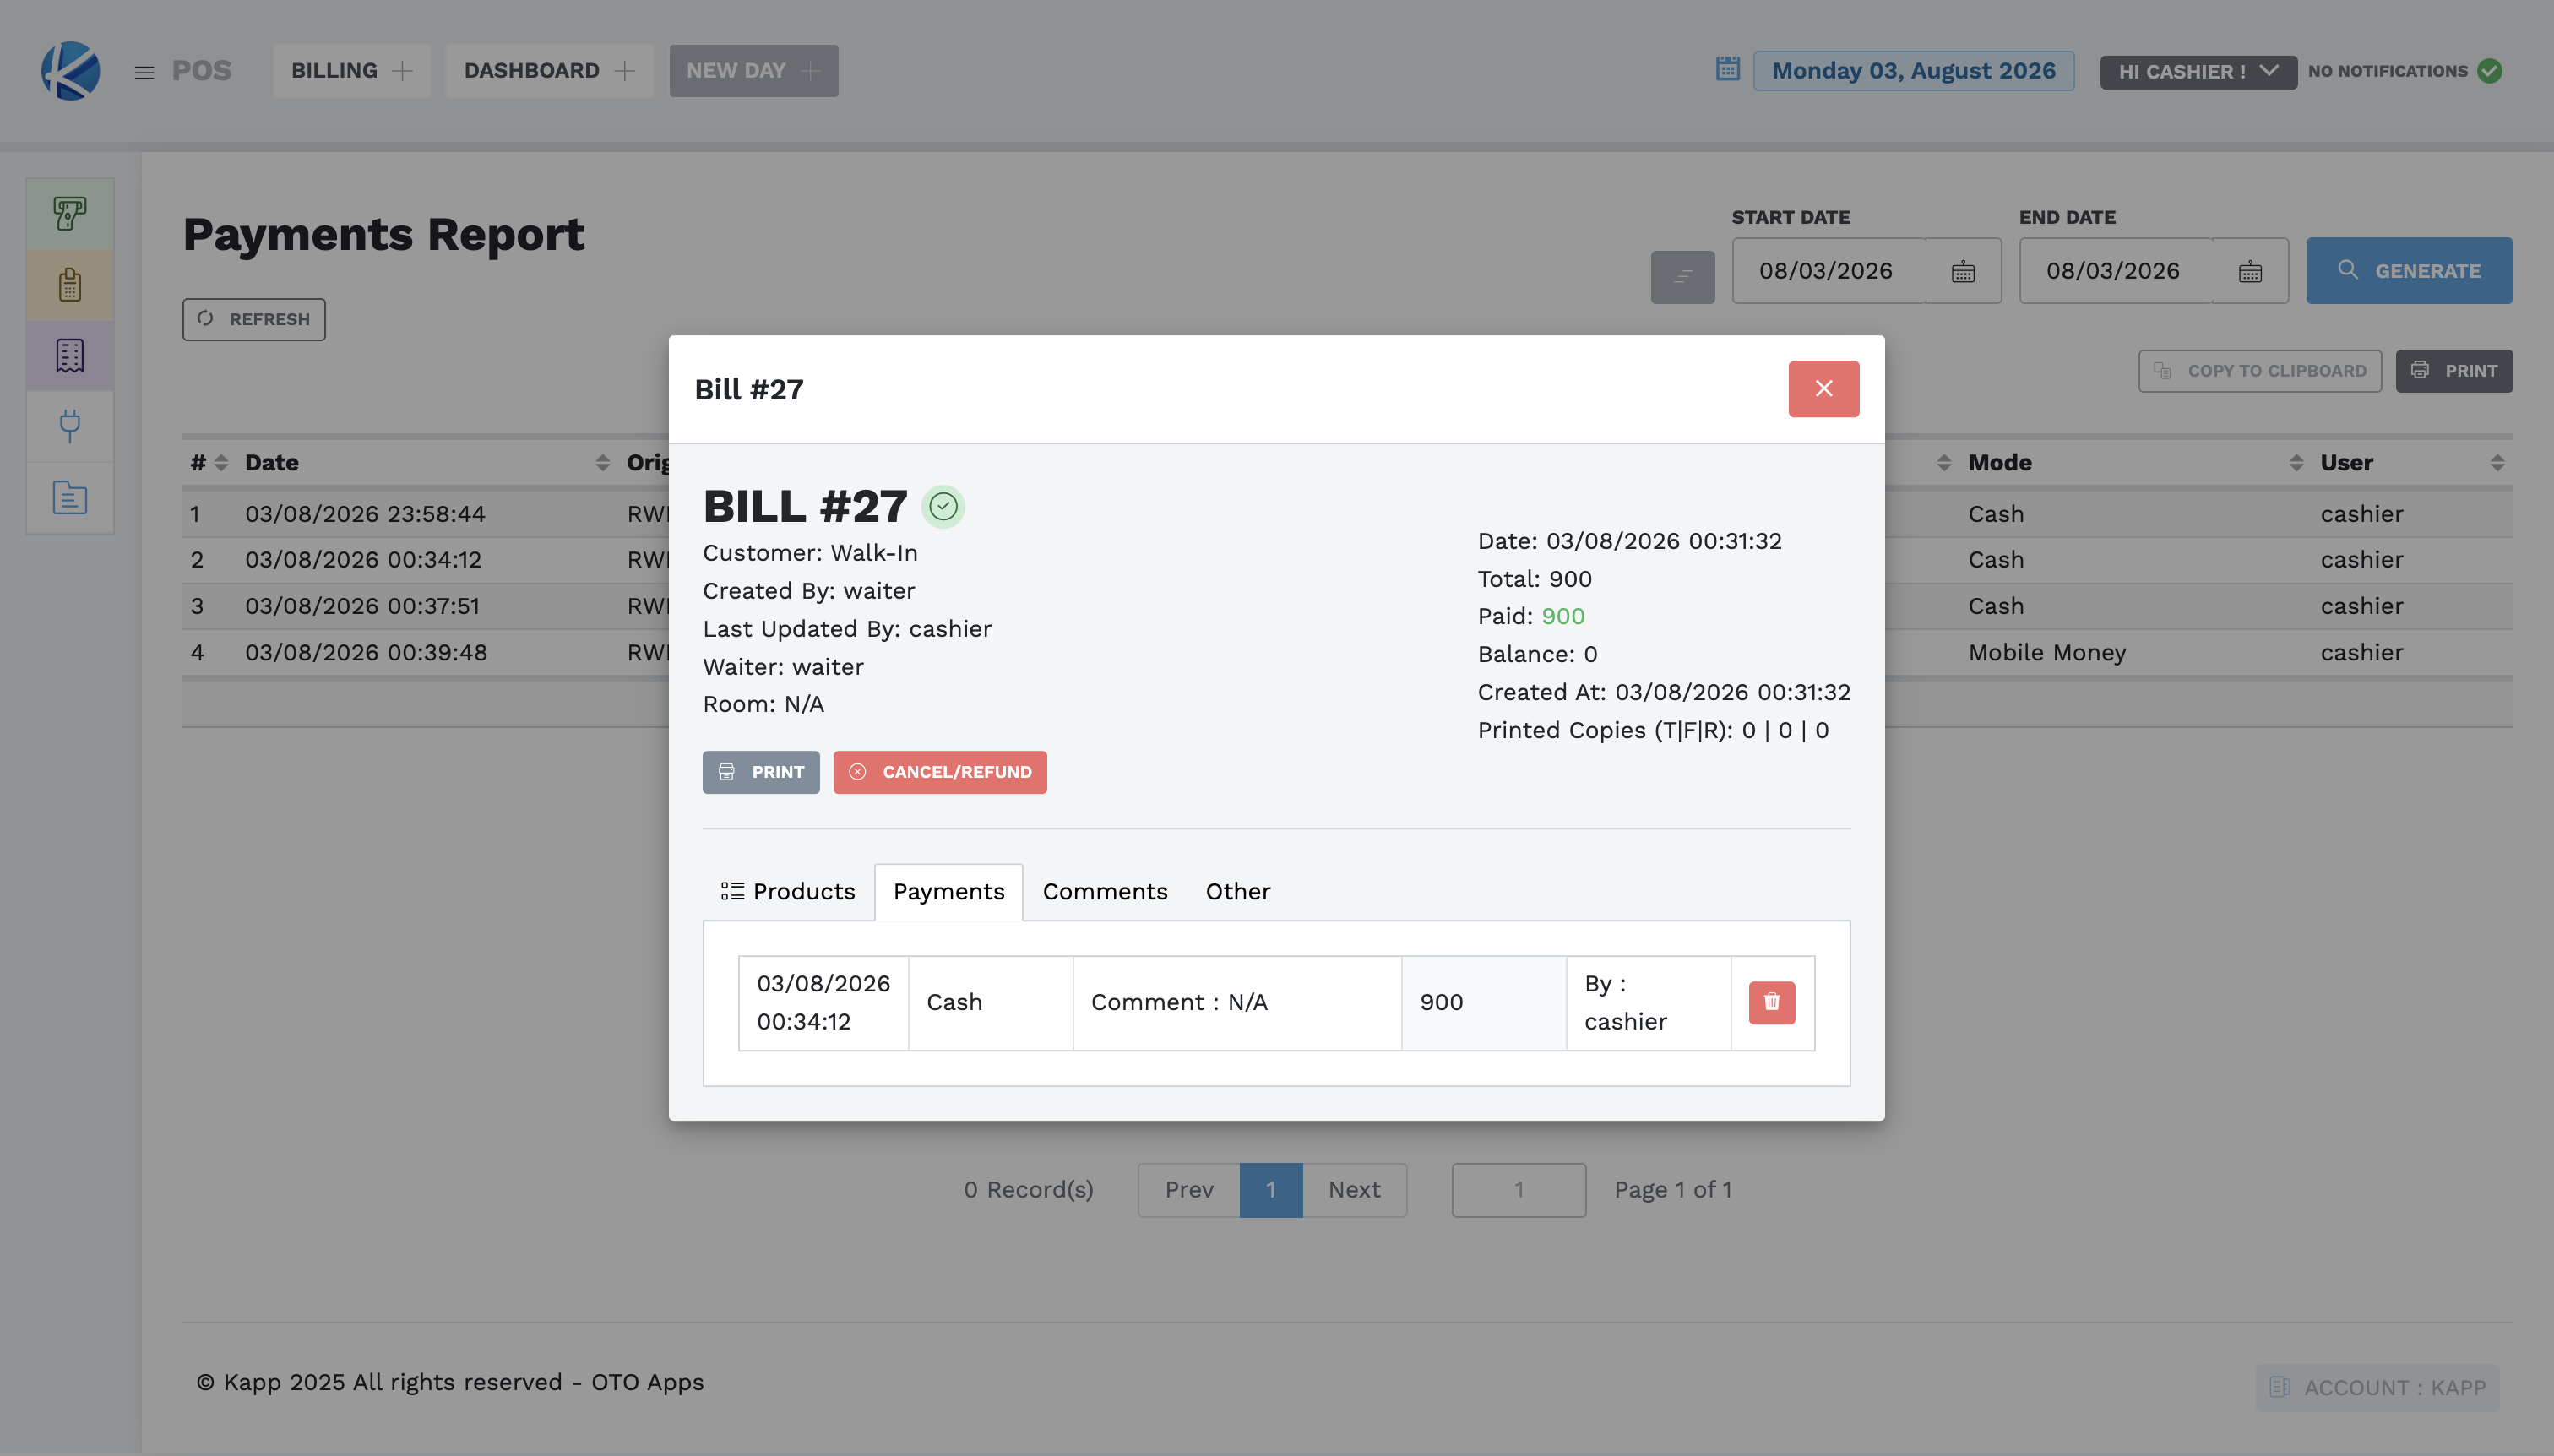
Use Bills → View whenever you need to inspect a bill after it has been saved. Before taking any action, match the bill ID and check its status, customer, waiter, room when applicable, total, amount paid, balance, date, and print counts.
- Products: review the billed items and quantities. The Order column in the Bills list shows the order IDs associated with the bill; use them to confirm that you are working with the intended orders.
- Payments: review every recorded payment, including its date, method, comment, amount, and the person who recorded it. Remove a payment only when the correction rules below allow it.
- Comments: review the notes, who entered them, and when they were entered.
- Other: view receipt information when it is available.
- Print: print from this saved bill only after checking the ID, status, and existing copy counts. Additional copies may require Supervisor approval.
- Cancel/Refund: this is for a Supervisor role or above. Cashiers and waiters record the request and escalate it.
Viewing a bill does not change it. Closing, removing a payment, printing an additional copy, or cancelling/refunding it can affect the transaction and must follow the rules for that action.
Create and pay a direct bill
Use this when there is nothing to bill from: no waiter order and no table. It is how a service is sold — a gym entry, a massage, pool or court time, a day pass — and how any counter sale is rung up where the customer orders and pays in one go.
You still choose a Served By identity, because every bill records who served it. A direct bill is not linked to a table, so nothing appears in Orders; the sale is proved by the bill itself.
- Open Billing and verify the displayed outlet.
- Add products and correct quantities.
- In Served By, choose the waiter identity. Walk-In is the default customer; select another customer only when the transaction requires one.
- Review items and total, then select SAVE.
- After Bill Saved!, select PAY.
- Enter the amount actually received and the matching payment method. Select a currency only when that field is visible. Add a useful comment when local policy requires it.
- Check the displayed remaining Balance.
- If the balance is zero, select Pay & Close Bill. Otherwise select Add Payment and record the remaining authorized payment separately.
- Confirm Payment added!, zero balance/closed status, and receipt outcome. Verify the completed bill in My Shift or Bills.
If Please add items to the bill appears, the bill has no lines yet. If Please Choose Waiter appears, set Served By before saving.
Tell products apart by their unit
A product that is sold in more than one unit appears once for each unit, and each one carries its own price. Picking the wrong line charges the wrong amount and takes the wrong quantity out of stock.
- The unit is shown in brackets after the name — Beer (crate), Water (box).
- A plain name with no brackets is the single piece — Beer is one bottle.
- Only the units the site allows for selling appear. If the unit you expect is missing, do not substitute a different one; report it.
- Adding the same product and the same unit again increases that line's quantity rather than starting a second line.
Read the whole tile before you tap it, and check the unit again on the bill before saving. Beer and Beer (crate) sit next to each other and differ only by the bracket.
Set or create a customer on a bill
Walk-In is appropriate for an ordinary anonymous sale. Set a named customer when the transaction, receipt, room posting, credit arrangement, or site policy requires one.
Select an existing customer
- In Billing, select the Customer field.
- Type part of the customer's name or identifying detail and select the exact matching record. Search carefully to avoid creating a duplicate.
- Confirm the selected customer appears on the bill before saving or finalizing it. A saved bill can be updated only while it is still pending.
Create a customer from Billing
- Open the Customer field and select Add New.
- Choose whether the customer is a company.
- Enter the known customer information. Complete every field marked with
*: first name, last name, email, phone, country, and city. Enter Tax ID, ID/passport, province, postal code, and street only when accurate and required. - Review the information with the customer, then select SUBMIT once.
- Confirm the new customer is selected on the bill before continuing.
Use customer information only for the approved business purpose. Never invent details to bypass a required field. If the customer already exists, use the existing record rather than creating another one.
When the customer has a TIN
If the selected customer holds a TIN, OTO asks for a TIN Purchase code for the bill. The code is what the tax receipt is requested against.
- Ask the customer for their purchase code and enter it in TIN Purchase code.
- Select SAVE.
- If the customer cannot supply a code, leave it empty and continue. OTO then uses the customer's phone number to request the tax receipt.
Enter the code the customer gives you. Never enter another customer's code, and never invent one to clear the prompt.
Close a bill brought by a waiter
-
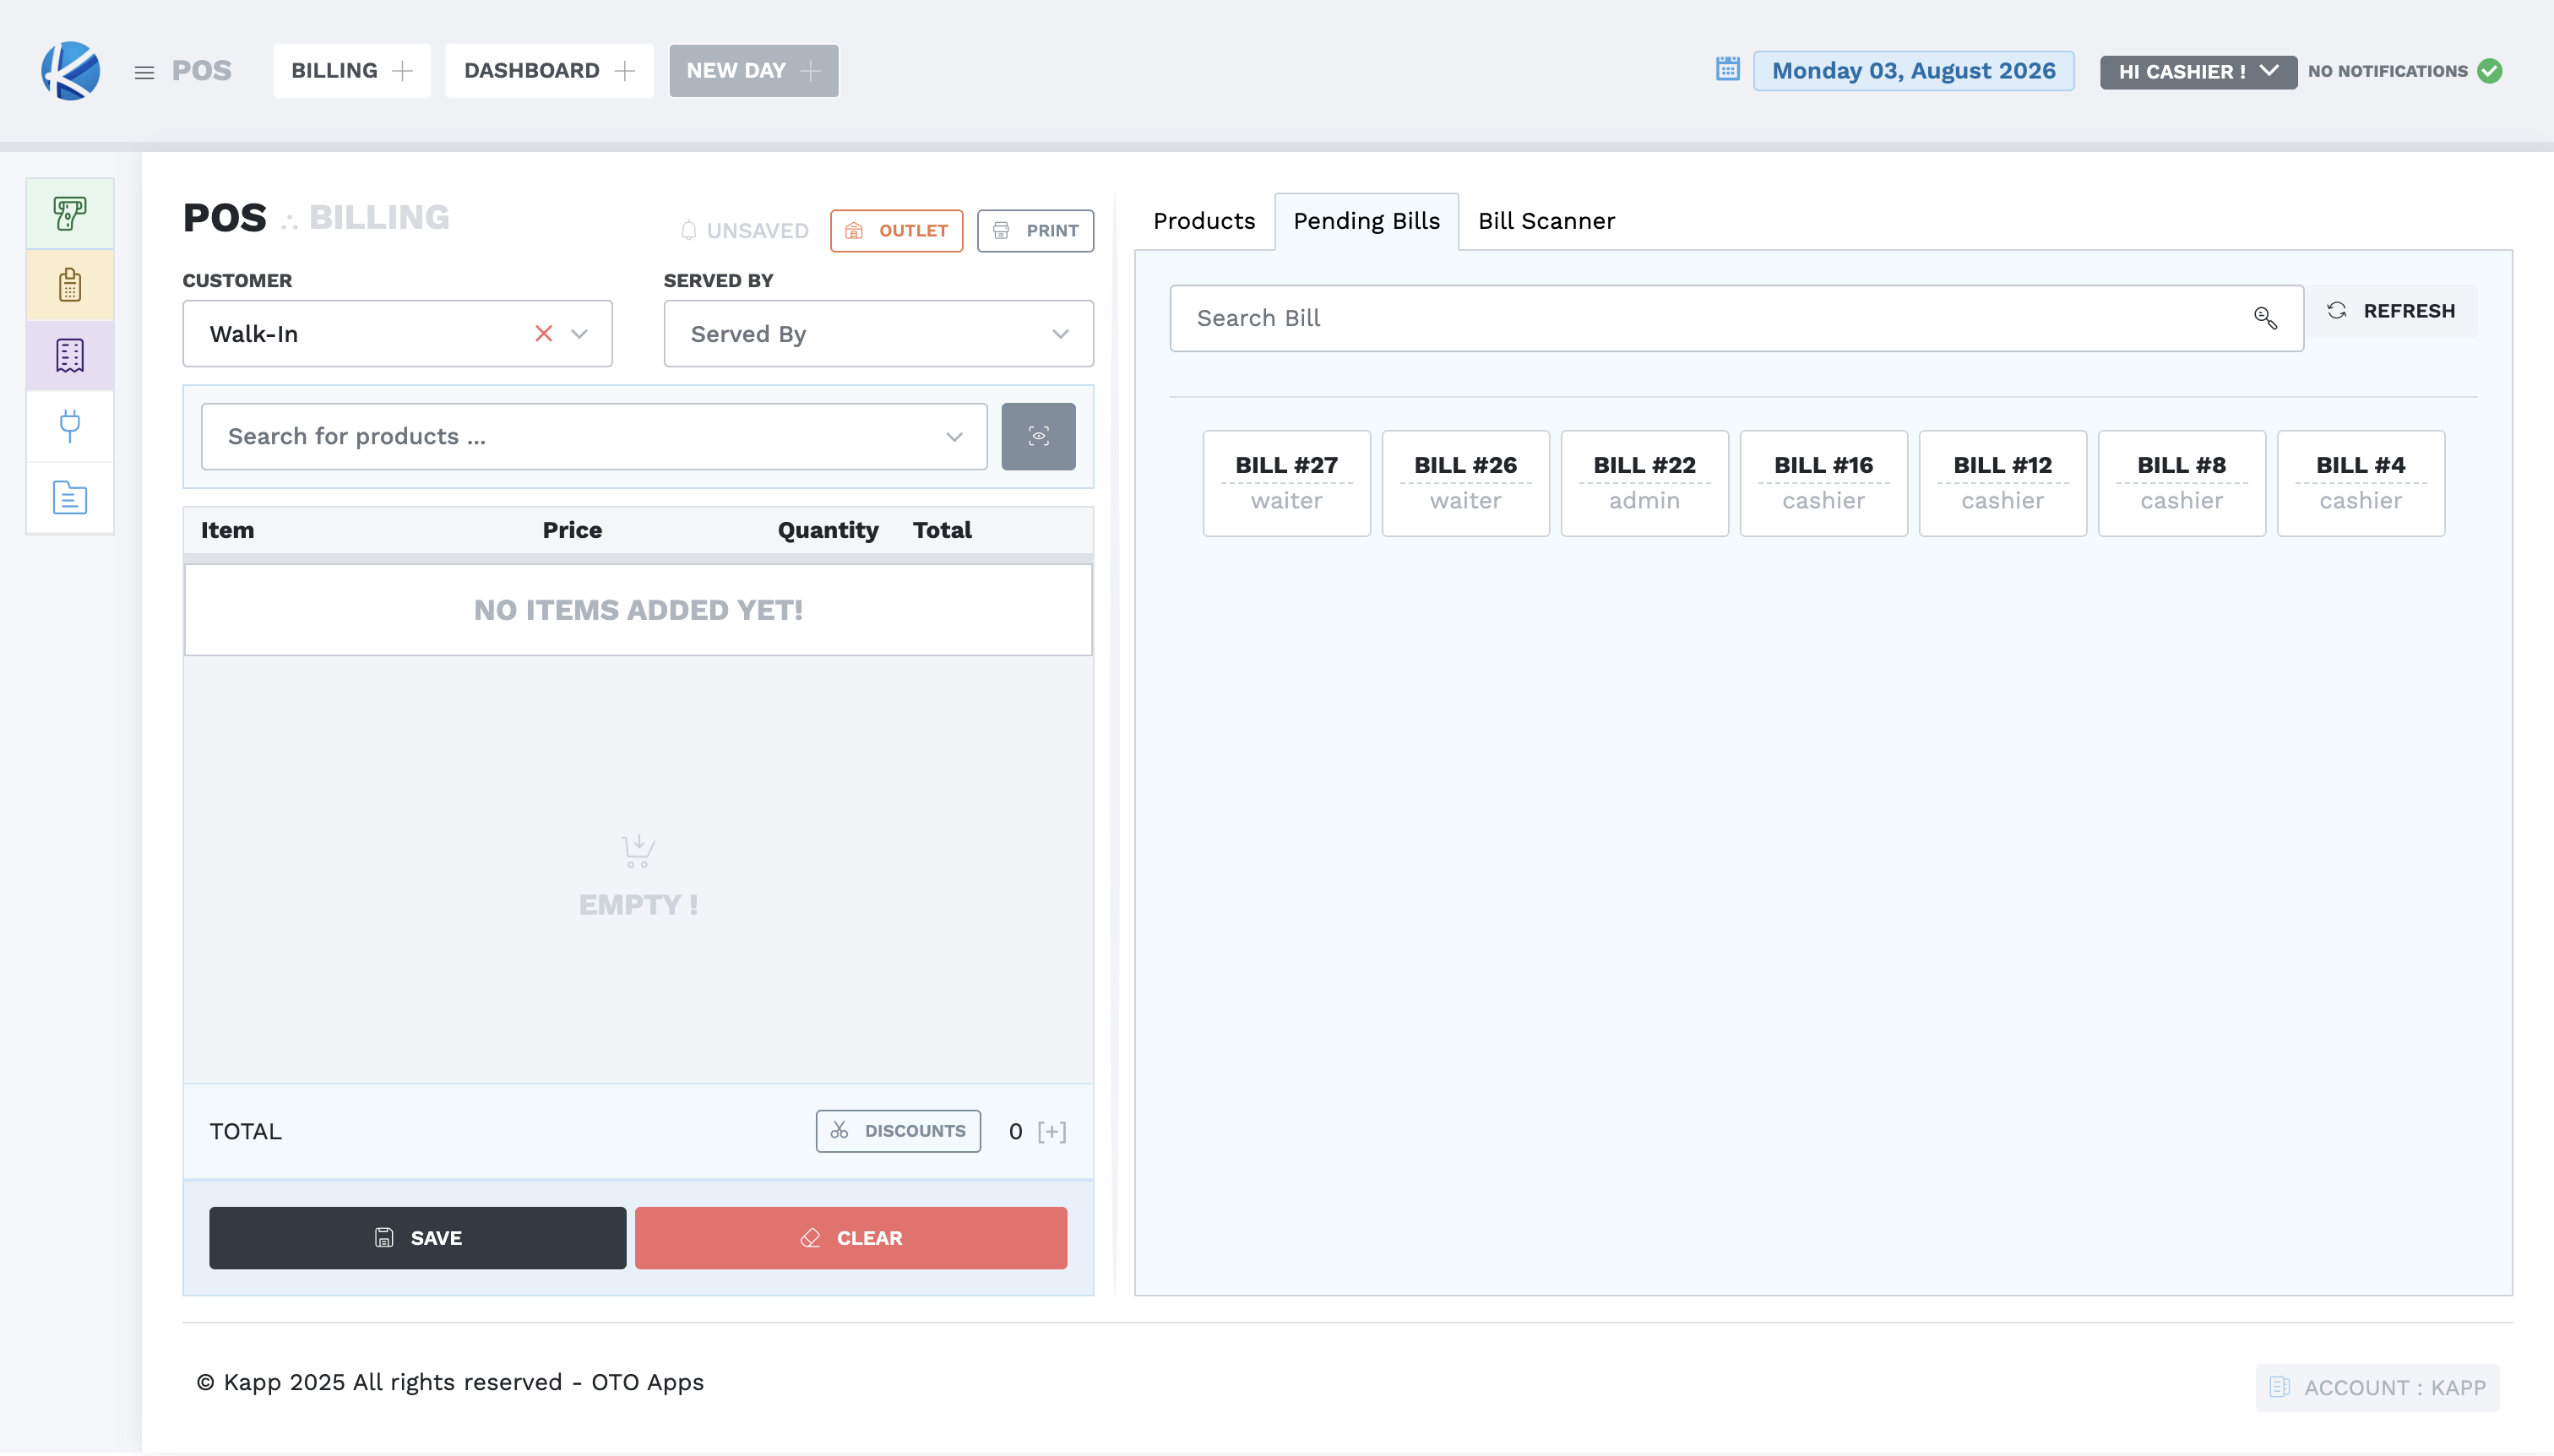
In the cashier BILLING workspace, select the Pending Bills tab.
-
Find the bill using its bill ID. Cross-check the waiter, customer/table when available, item total, discount, final amount, and the physical tender the waiter brought. Never choose a bill using the waiter name alone.
-
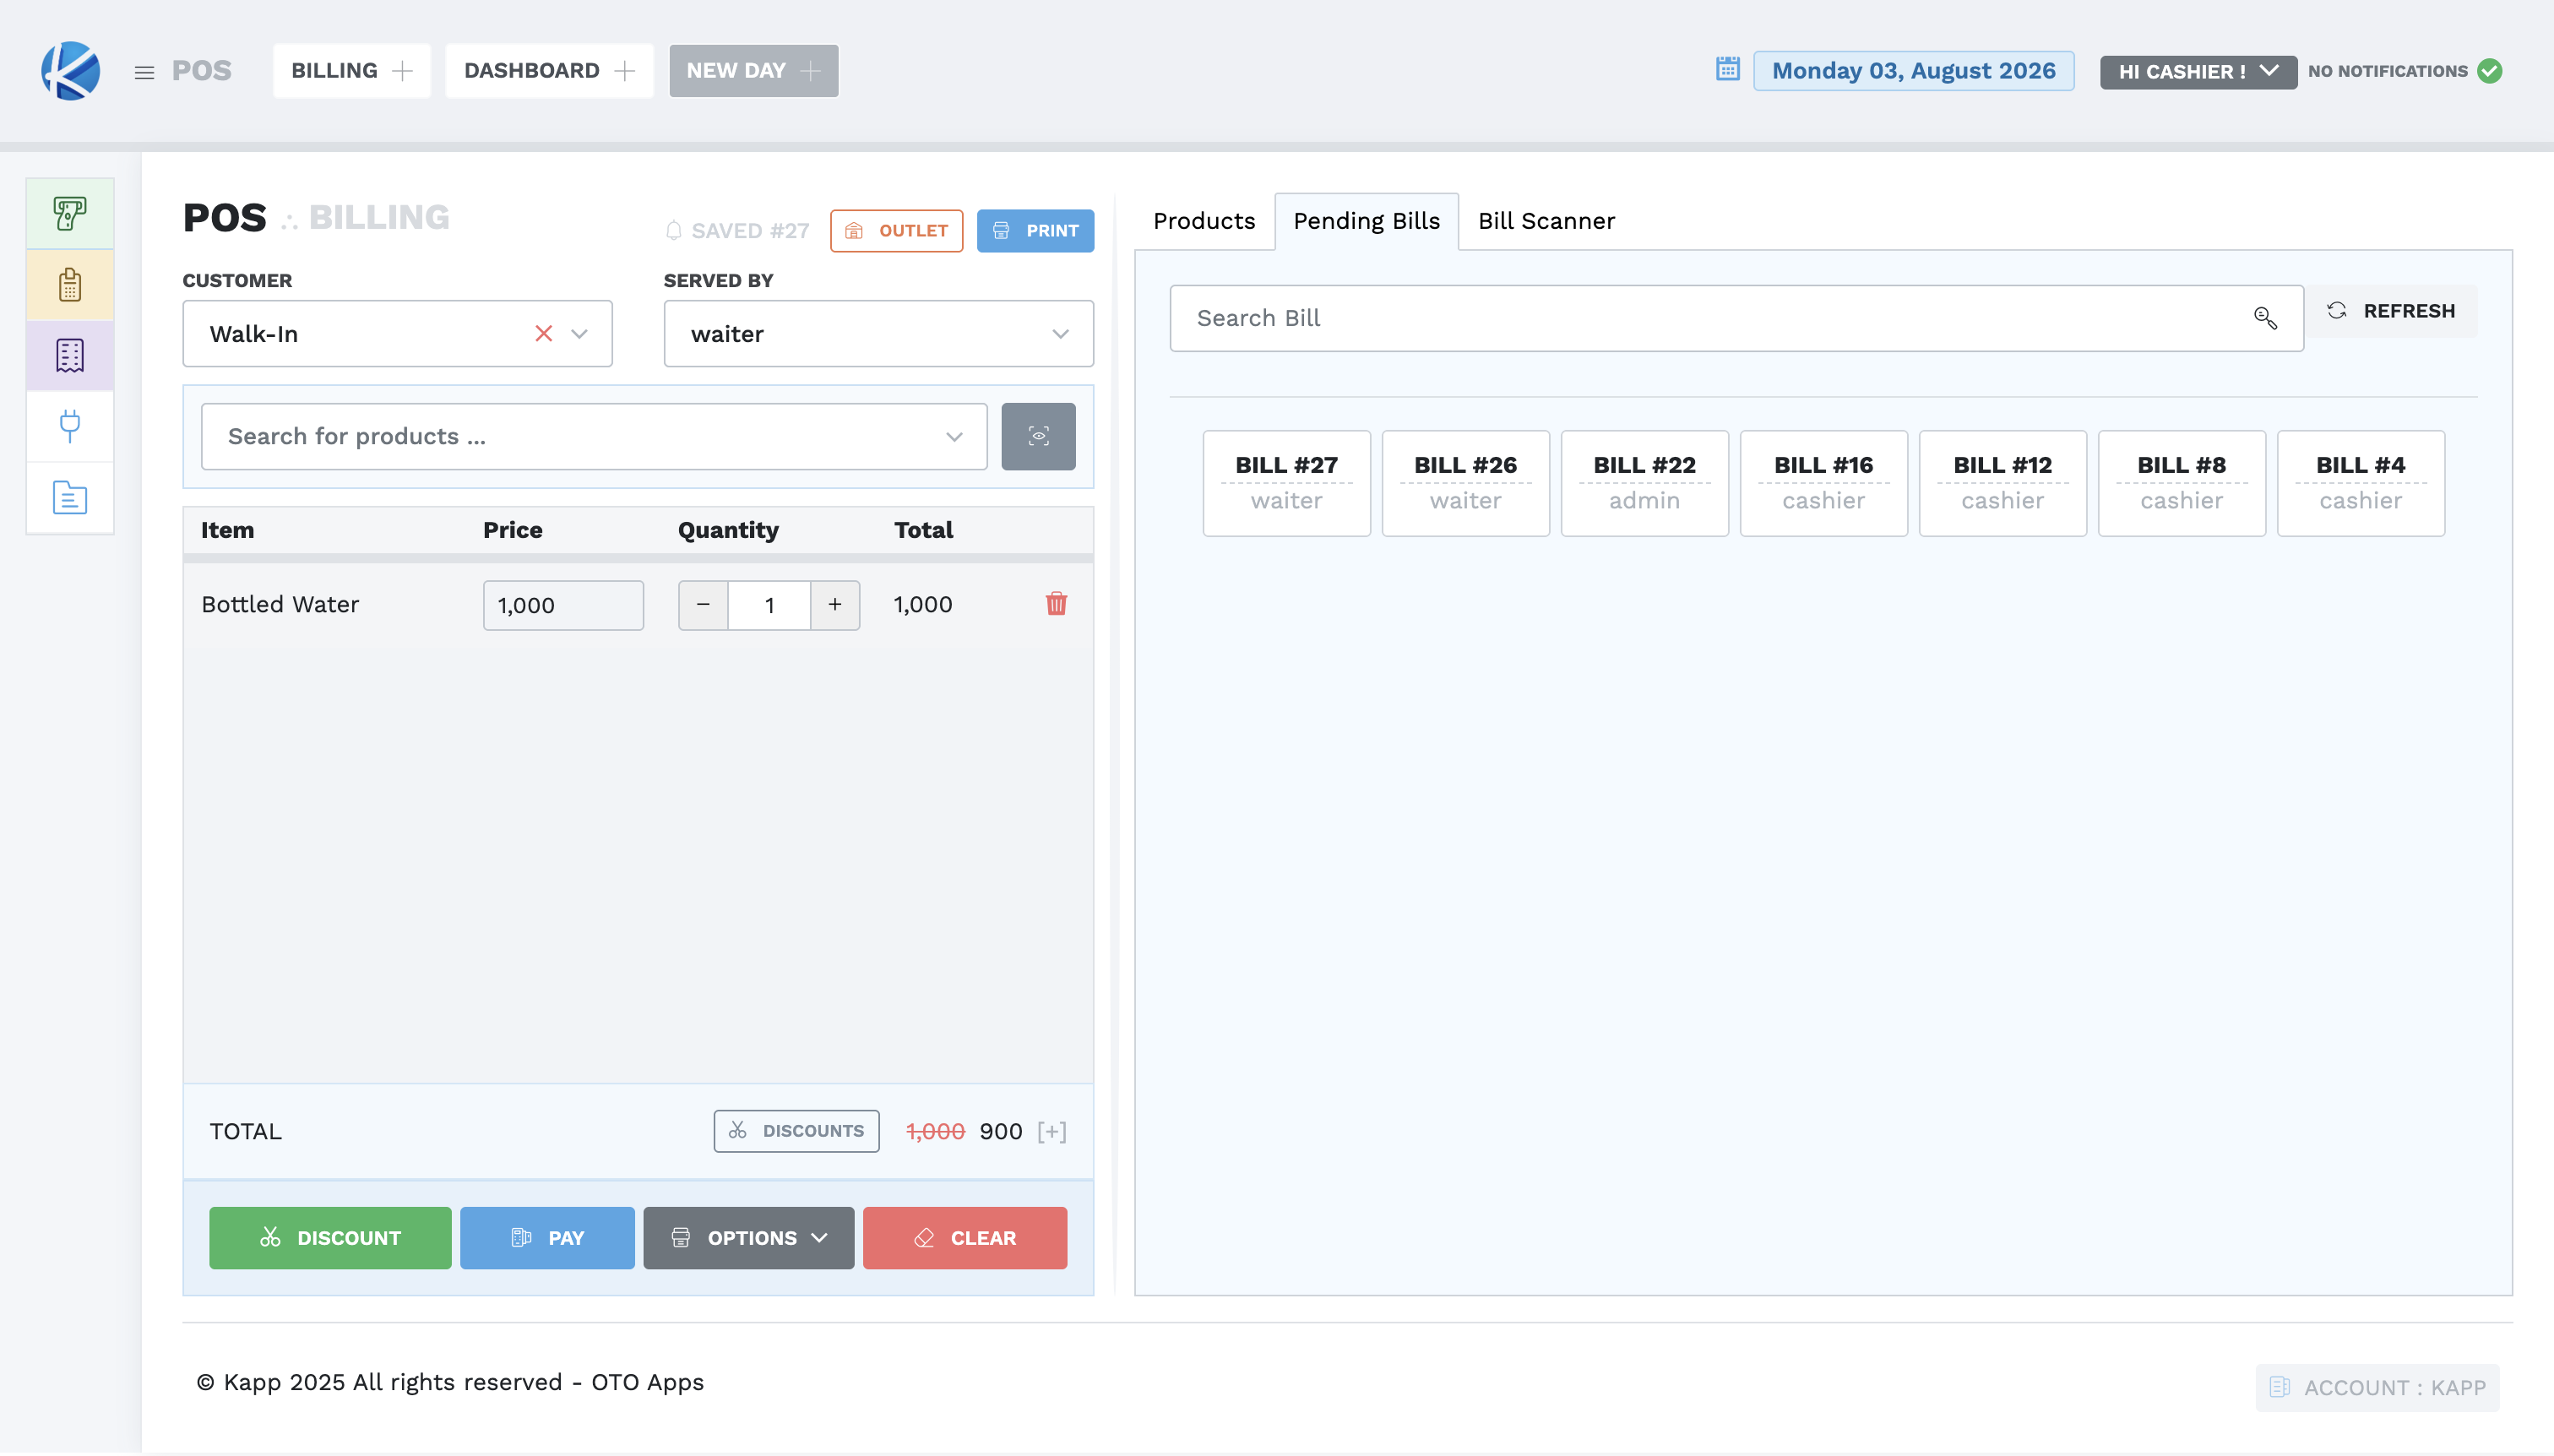
Open the bill and select PAY.
-
Enter the amount actually received and select the matching payment method. If the bill is discounted, collect and enter the discounted final amount, not the original item total.
-
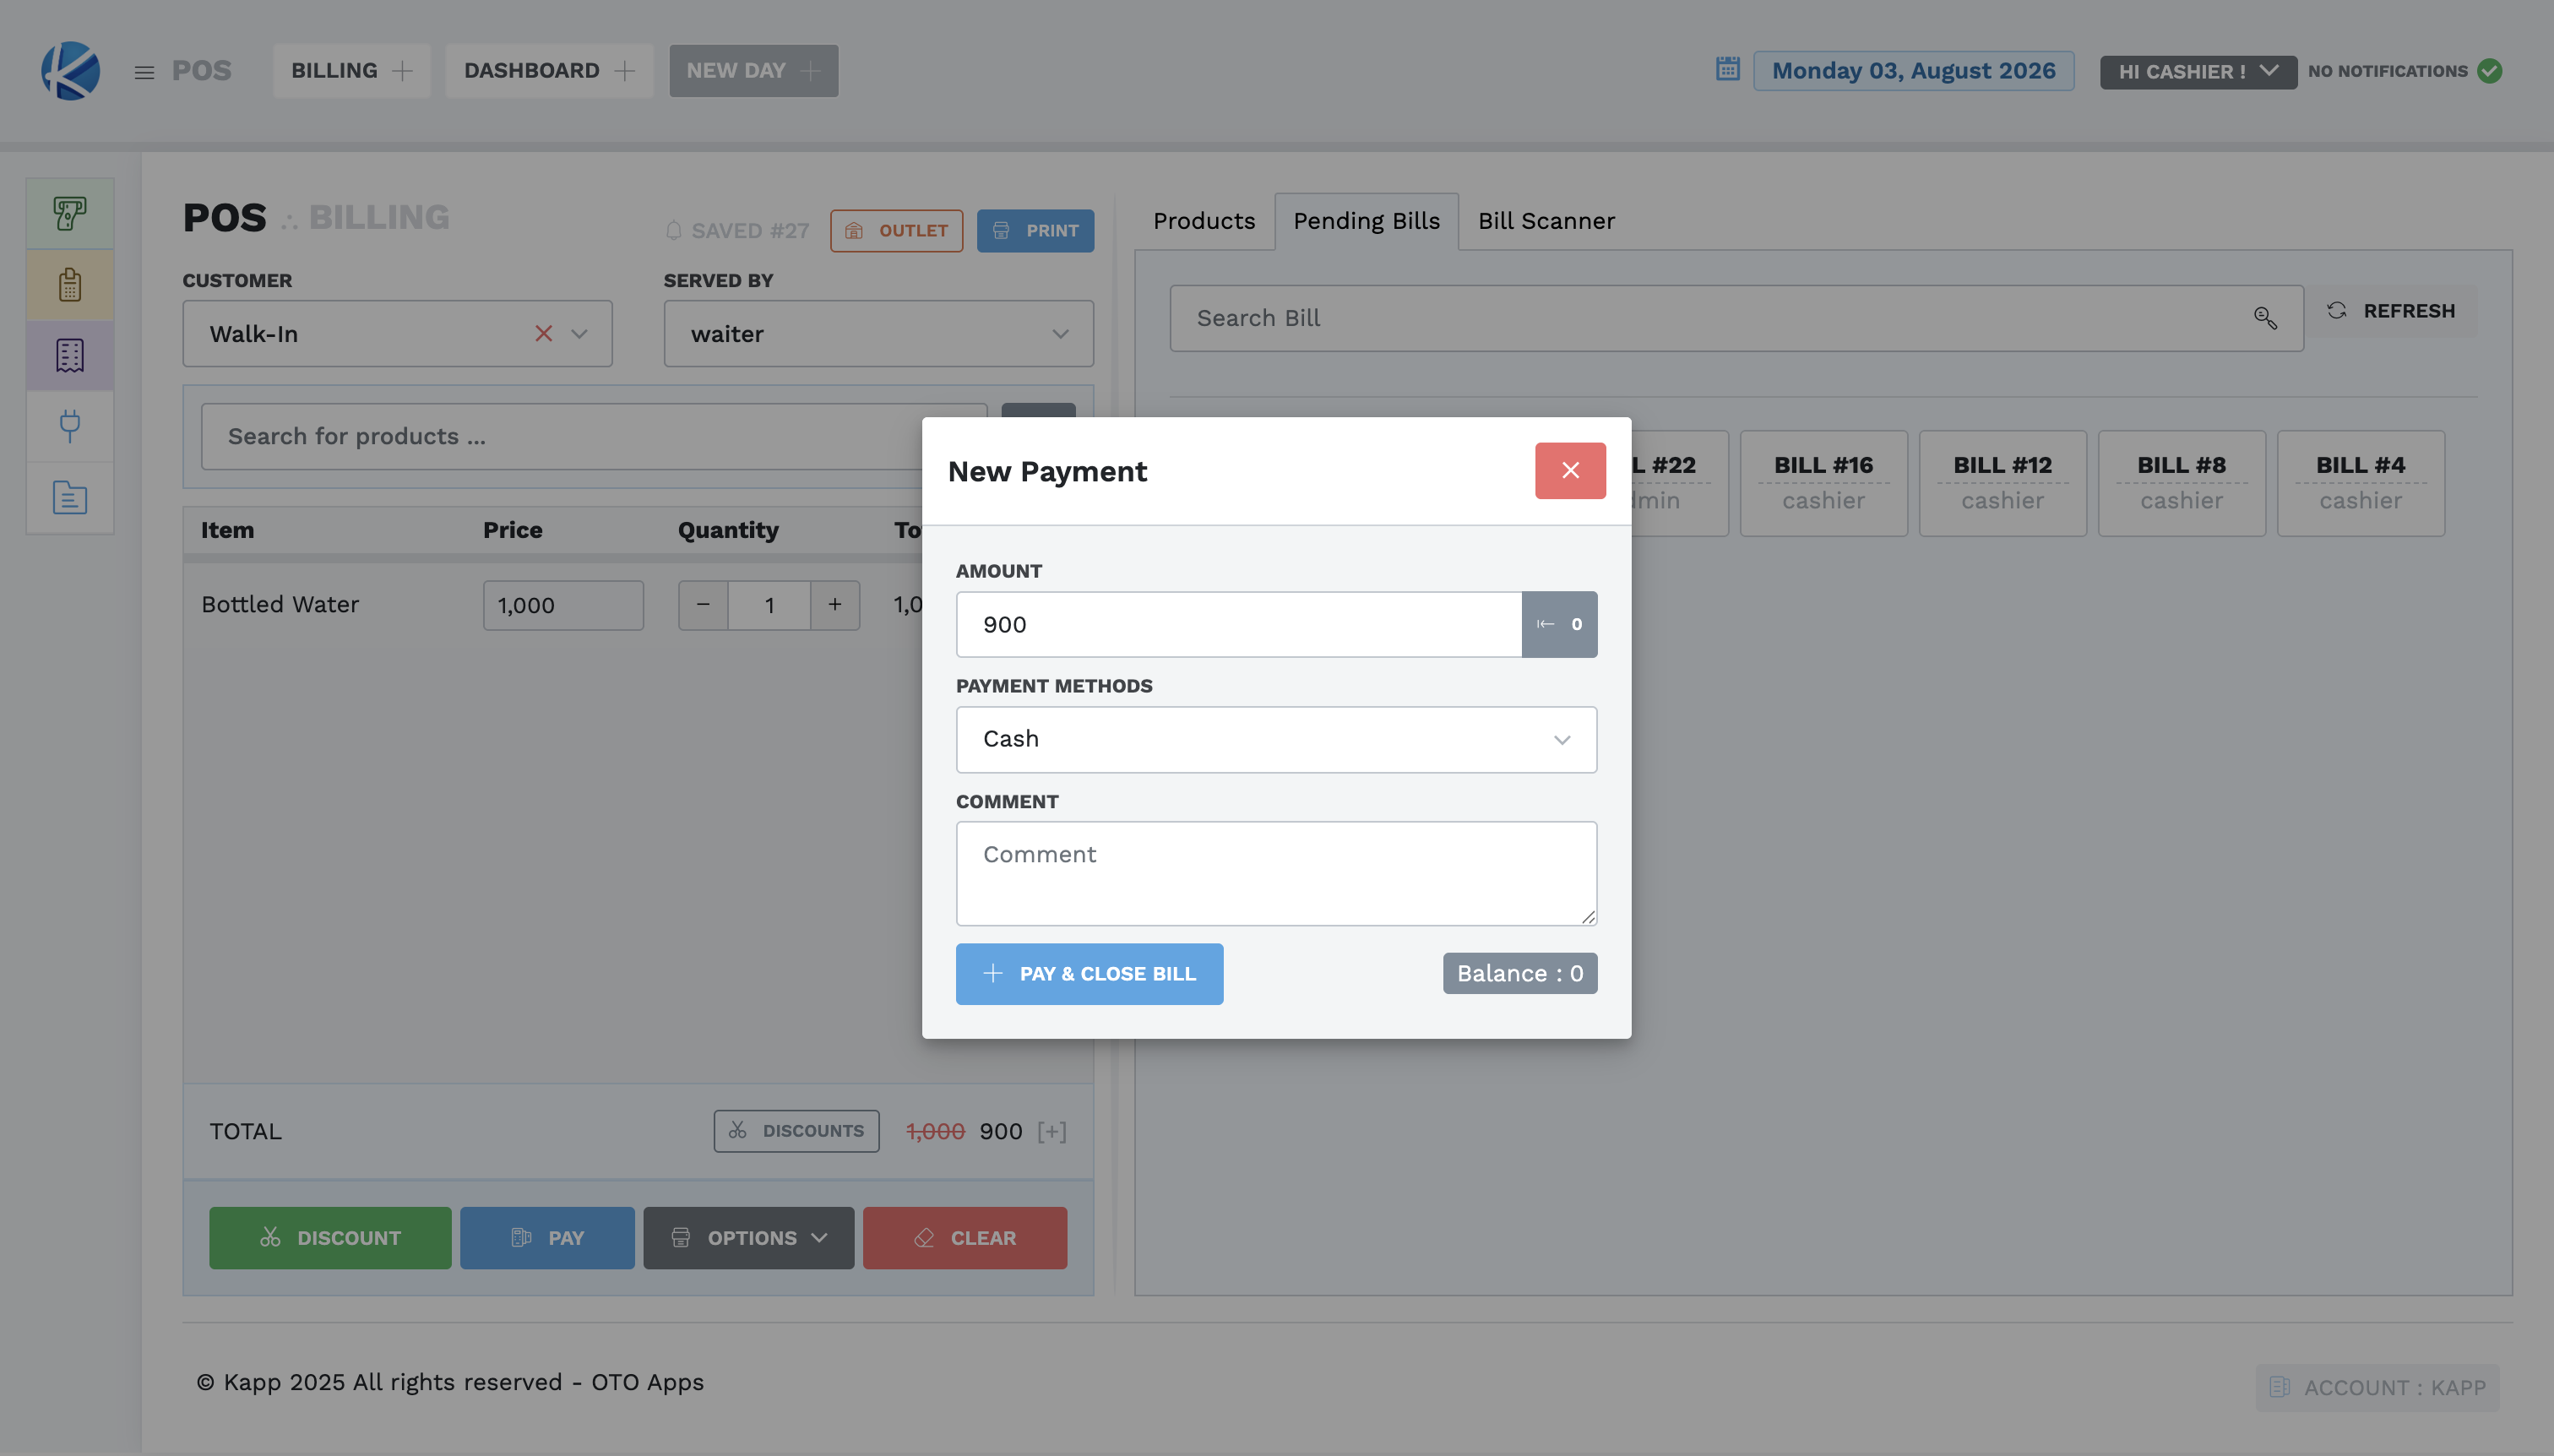
Confirm Balance: 0, then select PAY & CLOSE BILL once.
-
Reopen Pending Bills and confirm the bill is gone. Verify it in Bills or My Shift with the cashier, waiter, paid amount, method, and zero balance before returning any receipt/change through the waiter.
If the tender does not match the bill, stop and reconcile it with the waiter; do not alter the bill or payment merely to make it close. Saving by the waiter creates a pending bill. Only the cashier's recorded payment closes it.
Find a bill by scanning it
The billing screen has a Bill Scanner beside Pending Bills and Products. Use it when the customer hands you a printed bill.
- Open Bill Scanner and select START SCAN.
- Scan the code on the printed bill. The bill opens in Billing.
- If An invalid bill was scanned appears, the code did not match a bill on this site. Find the bill by ID in Pending Bills instead; do not create a new bill.
Scanning only finds the bill. Check the bill ID, waiter, items, and total on screen exactly as you would for a bill you opened from the list.
Record a split or partial payment
Use this only when site policy permits it and the customer actually supplied more than one tender.
- Open the correct pending bill and select PAY.
- Enter the first amount and its exact method. If a balance remains, verify the button says ADD PAYMENT, then select it once.
- Confirm Payment added! and the remaining balance.
- Enter the next amount and matching method.
- Select PAY & CLOSE BILL only when the balance reaches zero.
- Confirm the bill leaves Pending Bills. Use Reports → Payments to verify each payment by bill ID, amount, method, and cashier.
Complete an authorized complimentary bill
A complimentary bill is created by applying an approved configured 100% discount; it is not a separate Mark As choice.
- Open the correct pending bill and verify its ID, waiter/customer, items, and original total.
- Select DISCOUNTS. Apply the approved 100% discount to every intended bill item and enter a clear reason.
- Select SAVE DISCOUNTS and verify that the final total is zero.
- Do not add a payment. Confirm that OTO completes the bill as complimentary and that it leaves Pending Bills.
- Verify the bill under Reports → Complementary Bills, including its bill ID, original value, discount, waiter/cashier, and reason where displayed.
Use a 100% discount only with the approval required by your site. If any item retains a balance, stop and correct the discount selection; do not enter a payment merely to force the bill to close.
Correct a mistaken payment
- On a bill that is still open, use Bills → View → Payments. The cashier who recorded the payment can use its delete control. Confirm the corrected paid amount and balance before entering the right tender.
- On a closed bill, the current build rejects removal—even on the same business date—with: This payment cannot be removed, you may need to initiate a refund instead. Leave the payment intact and escalate to Supervisor role or above for the refund/correction workflow.
- A visible trash control does not prove the payment can be removed. Never create an offsetting payment or cancel the entire bill to hide a tender-entry mistake.
For now, treat a payment on a closed bill as a refund request and escalate it to a Supervisor or above.
Important controls
- A bill must be saved before payment can be added.
- The OTO payment method must match the customer's tender.
- Printing does not prove payment; status and balance do.
- For split payments, the sum of all recorded methods must equal the bill's final amount; verify individual entries in the Payments report.
- Never recreate a successful transaction because its receipt did not print.
Authorized exceptions
Only use these when your role and local policy permit them.
- Cancel/refund: only users with the Supervisor role or above may cancel a bill. Cashiers and waiters must not attempt it, even when OPTIONS → Cancel is visible. Record the bill ID, waiter, amount, payment status, requested reason, and requester, then escalate to a Supervisor, Manager, or Administrator under site policy. That authorized user must choose the accurate configured refund reason, add a meaningful comment, decide separately whether associated orders should also be cancelled, and verify the result in Cancelled Bills. A denied attempt leaves the bill pending.
- Send To Room: select OPTIONS → Send To Room, enter the exact room and a useful comment. OTO checks that the room is occupied before showing a final confirmation containing the room and guest name. Confirm only when both match the authorized request. No occupied-room posting was completed during live validation.
- On-Credit: assign the approved credit customer first; never leave the generic Walk-In customer for a credit account. Select OPTIONS → Mark As → On-Credit, verify the displayed customer, add a comment, and save only under the site's credit authorization. This finalizes the pending bill; live submission was intentionally not performed.
- Print/reprint: first verify bill ID and status, then use the saved bill's PRINT action. Verify physical output and the print counter. If printing fails, leave the transaction unchanged and report the exact message; never recreate the bill or payment.
A bill may normally be printed up to twice across its stages—for example, once before final payment and once as the final receipt. Another copy requires a Supervisor role or above. Do not ask another Cashier to print it as a workaround; give the Supervisor the bill ID and reason for the additional copy.
The training workstation did not produce a verified reprint. If this happens, verify the bill, report the message, and follow the local receipt fallback.
Cancelling a bill and cancelling its associated order are separate decisions. Do not enable Also cancel the associated orders automatically: order cancellation can affect table history and stock. Paid-bill refunds require a Supervisor-or-above user and the site's refund procedure; they were not validated with the cashier role.
Check your shift
Use three views; none should be treated as sufficient by itself:
- BILLING → Pending Bills: identify every bill still awaiting payment or correction. Record bill ID, waiter, amount, and reason it remains open.
-
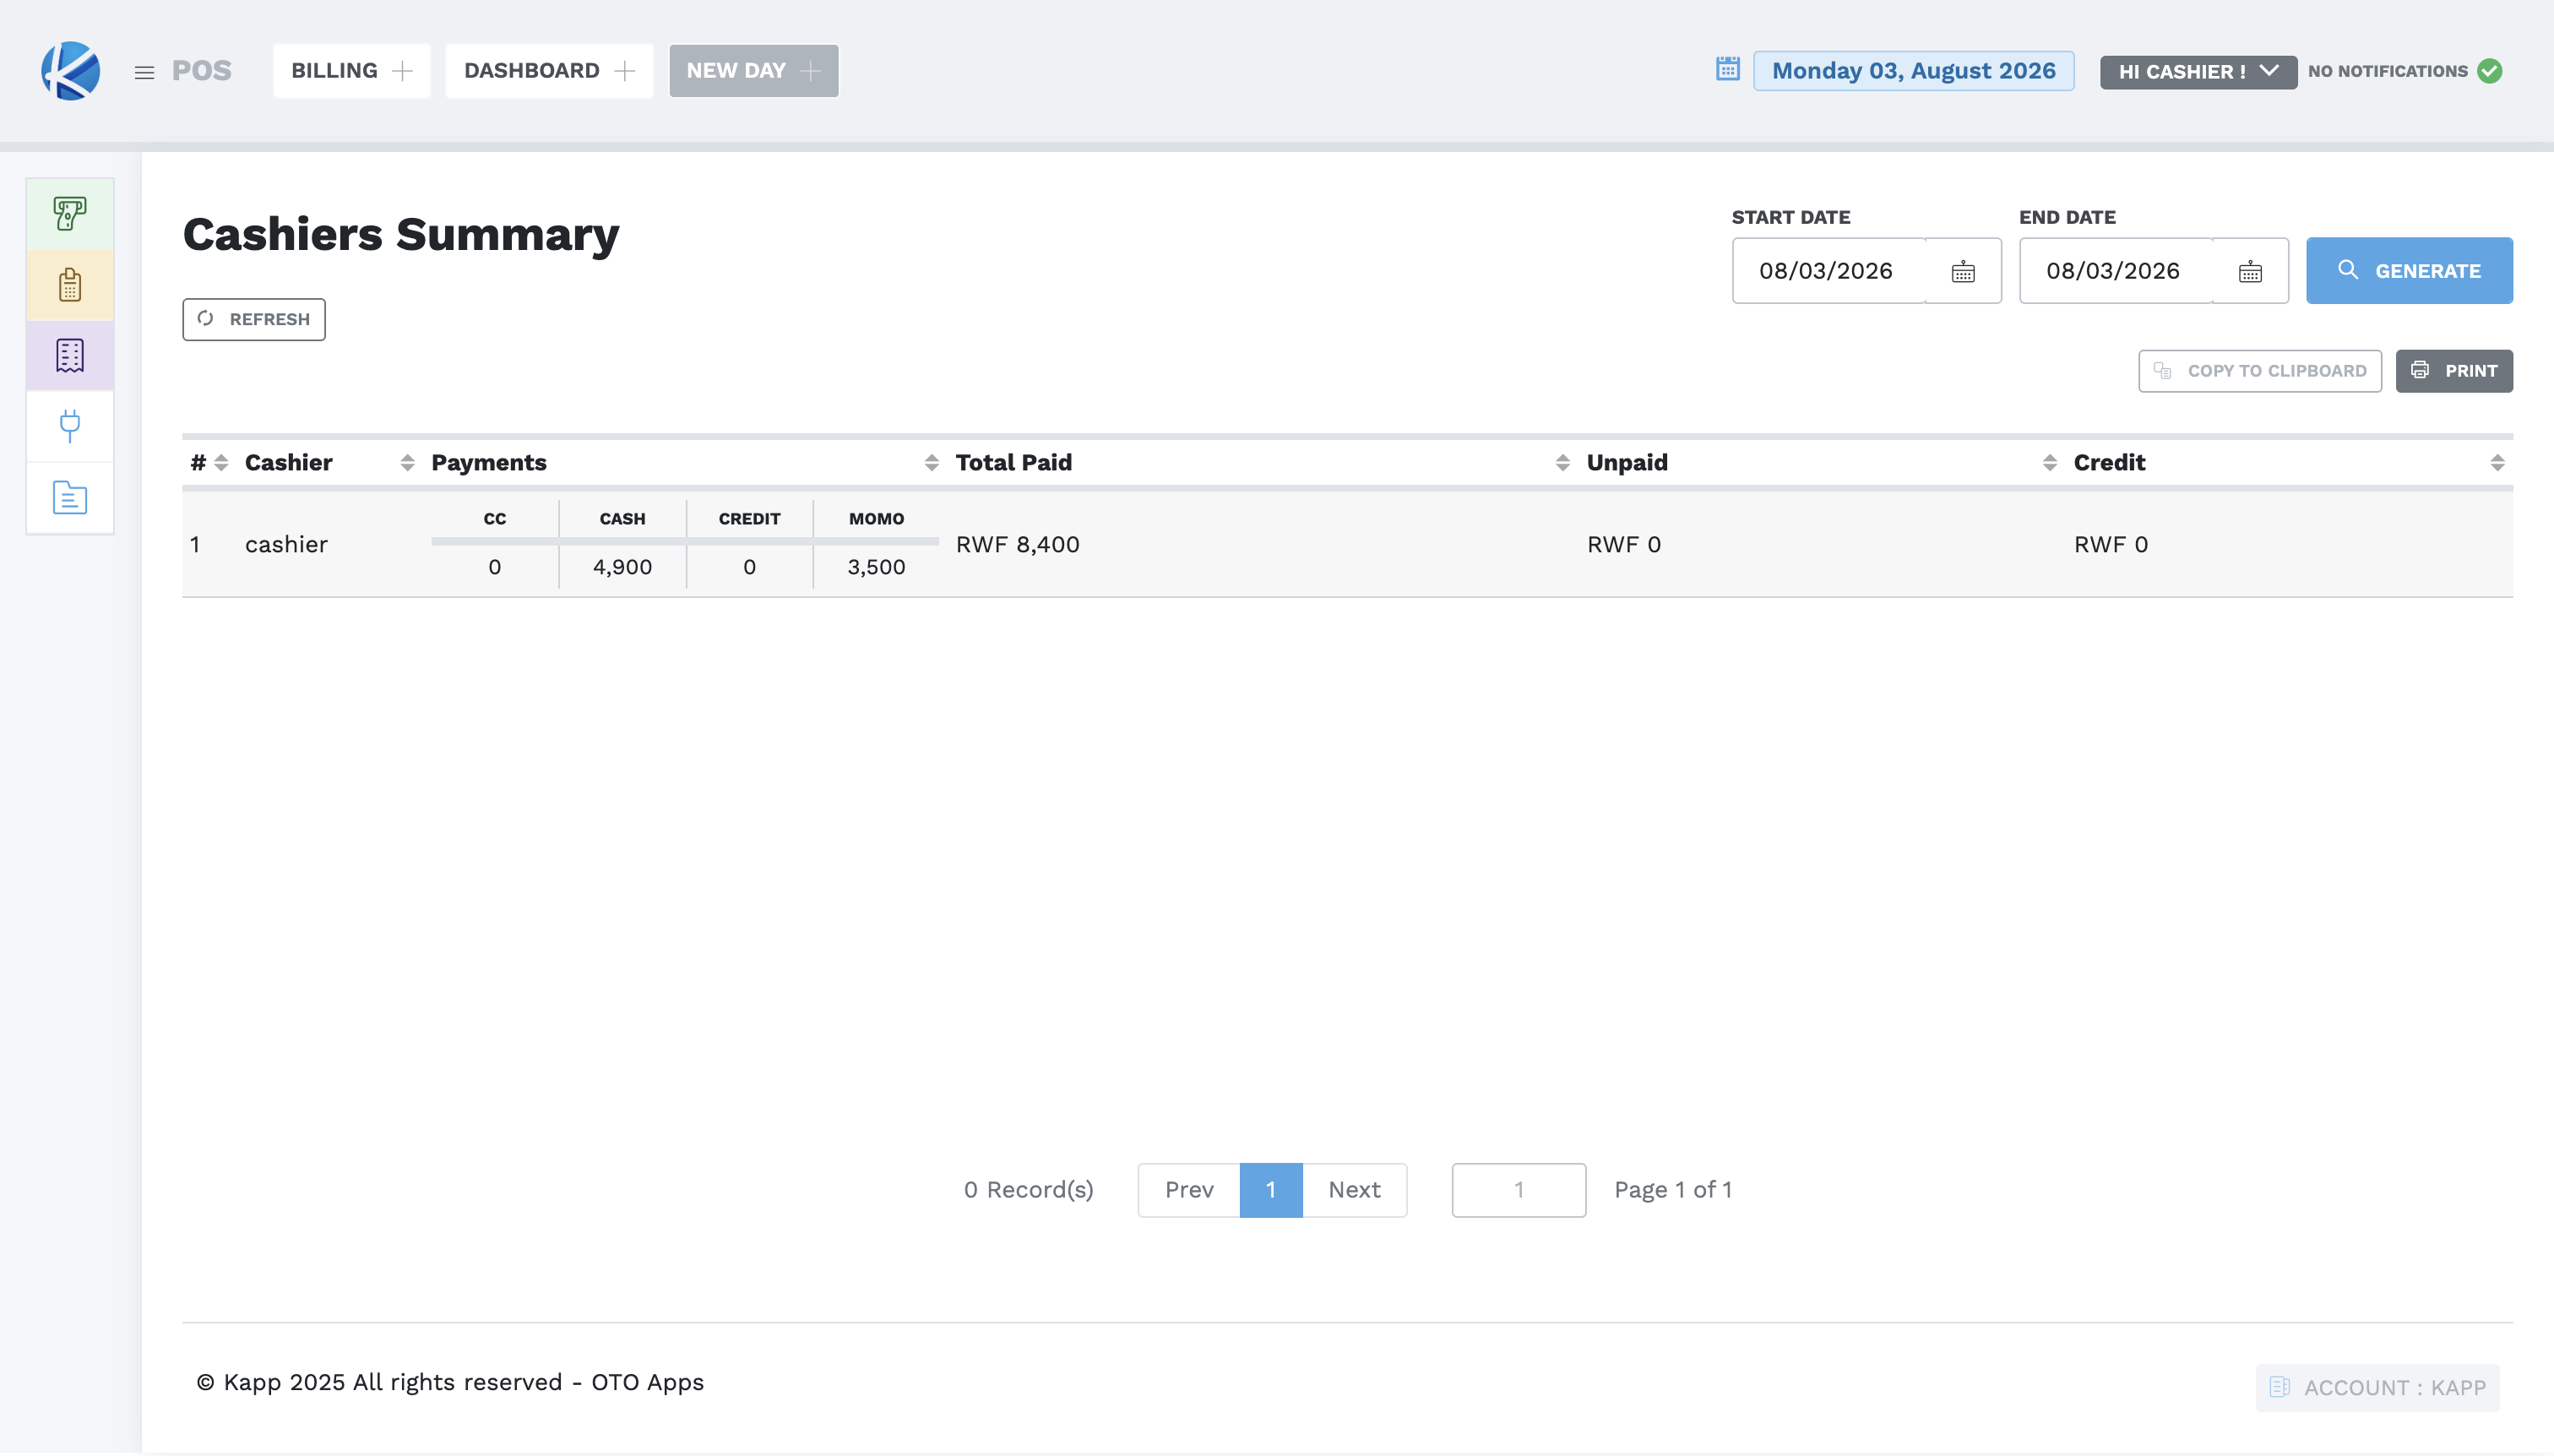
Reports → Cashier Summary: confirm the date, cashier, each payment-method total, and Total Paid against physical cash and external tender records.
-
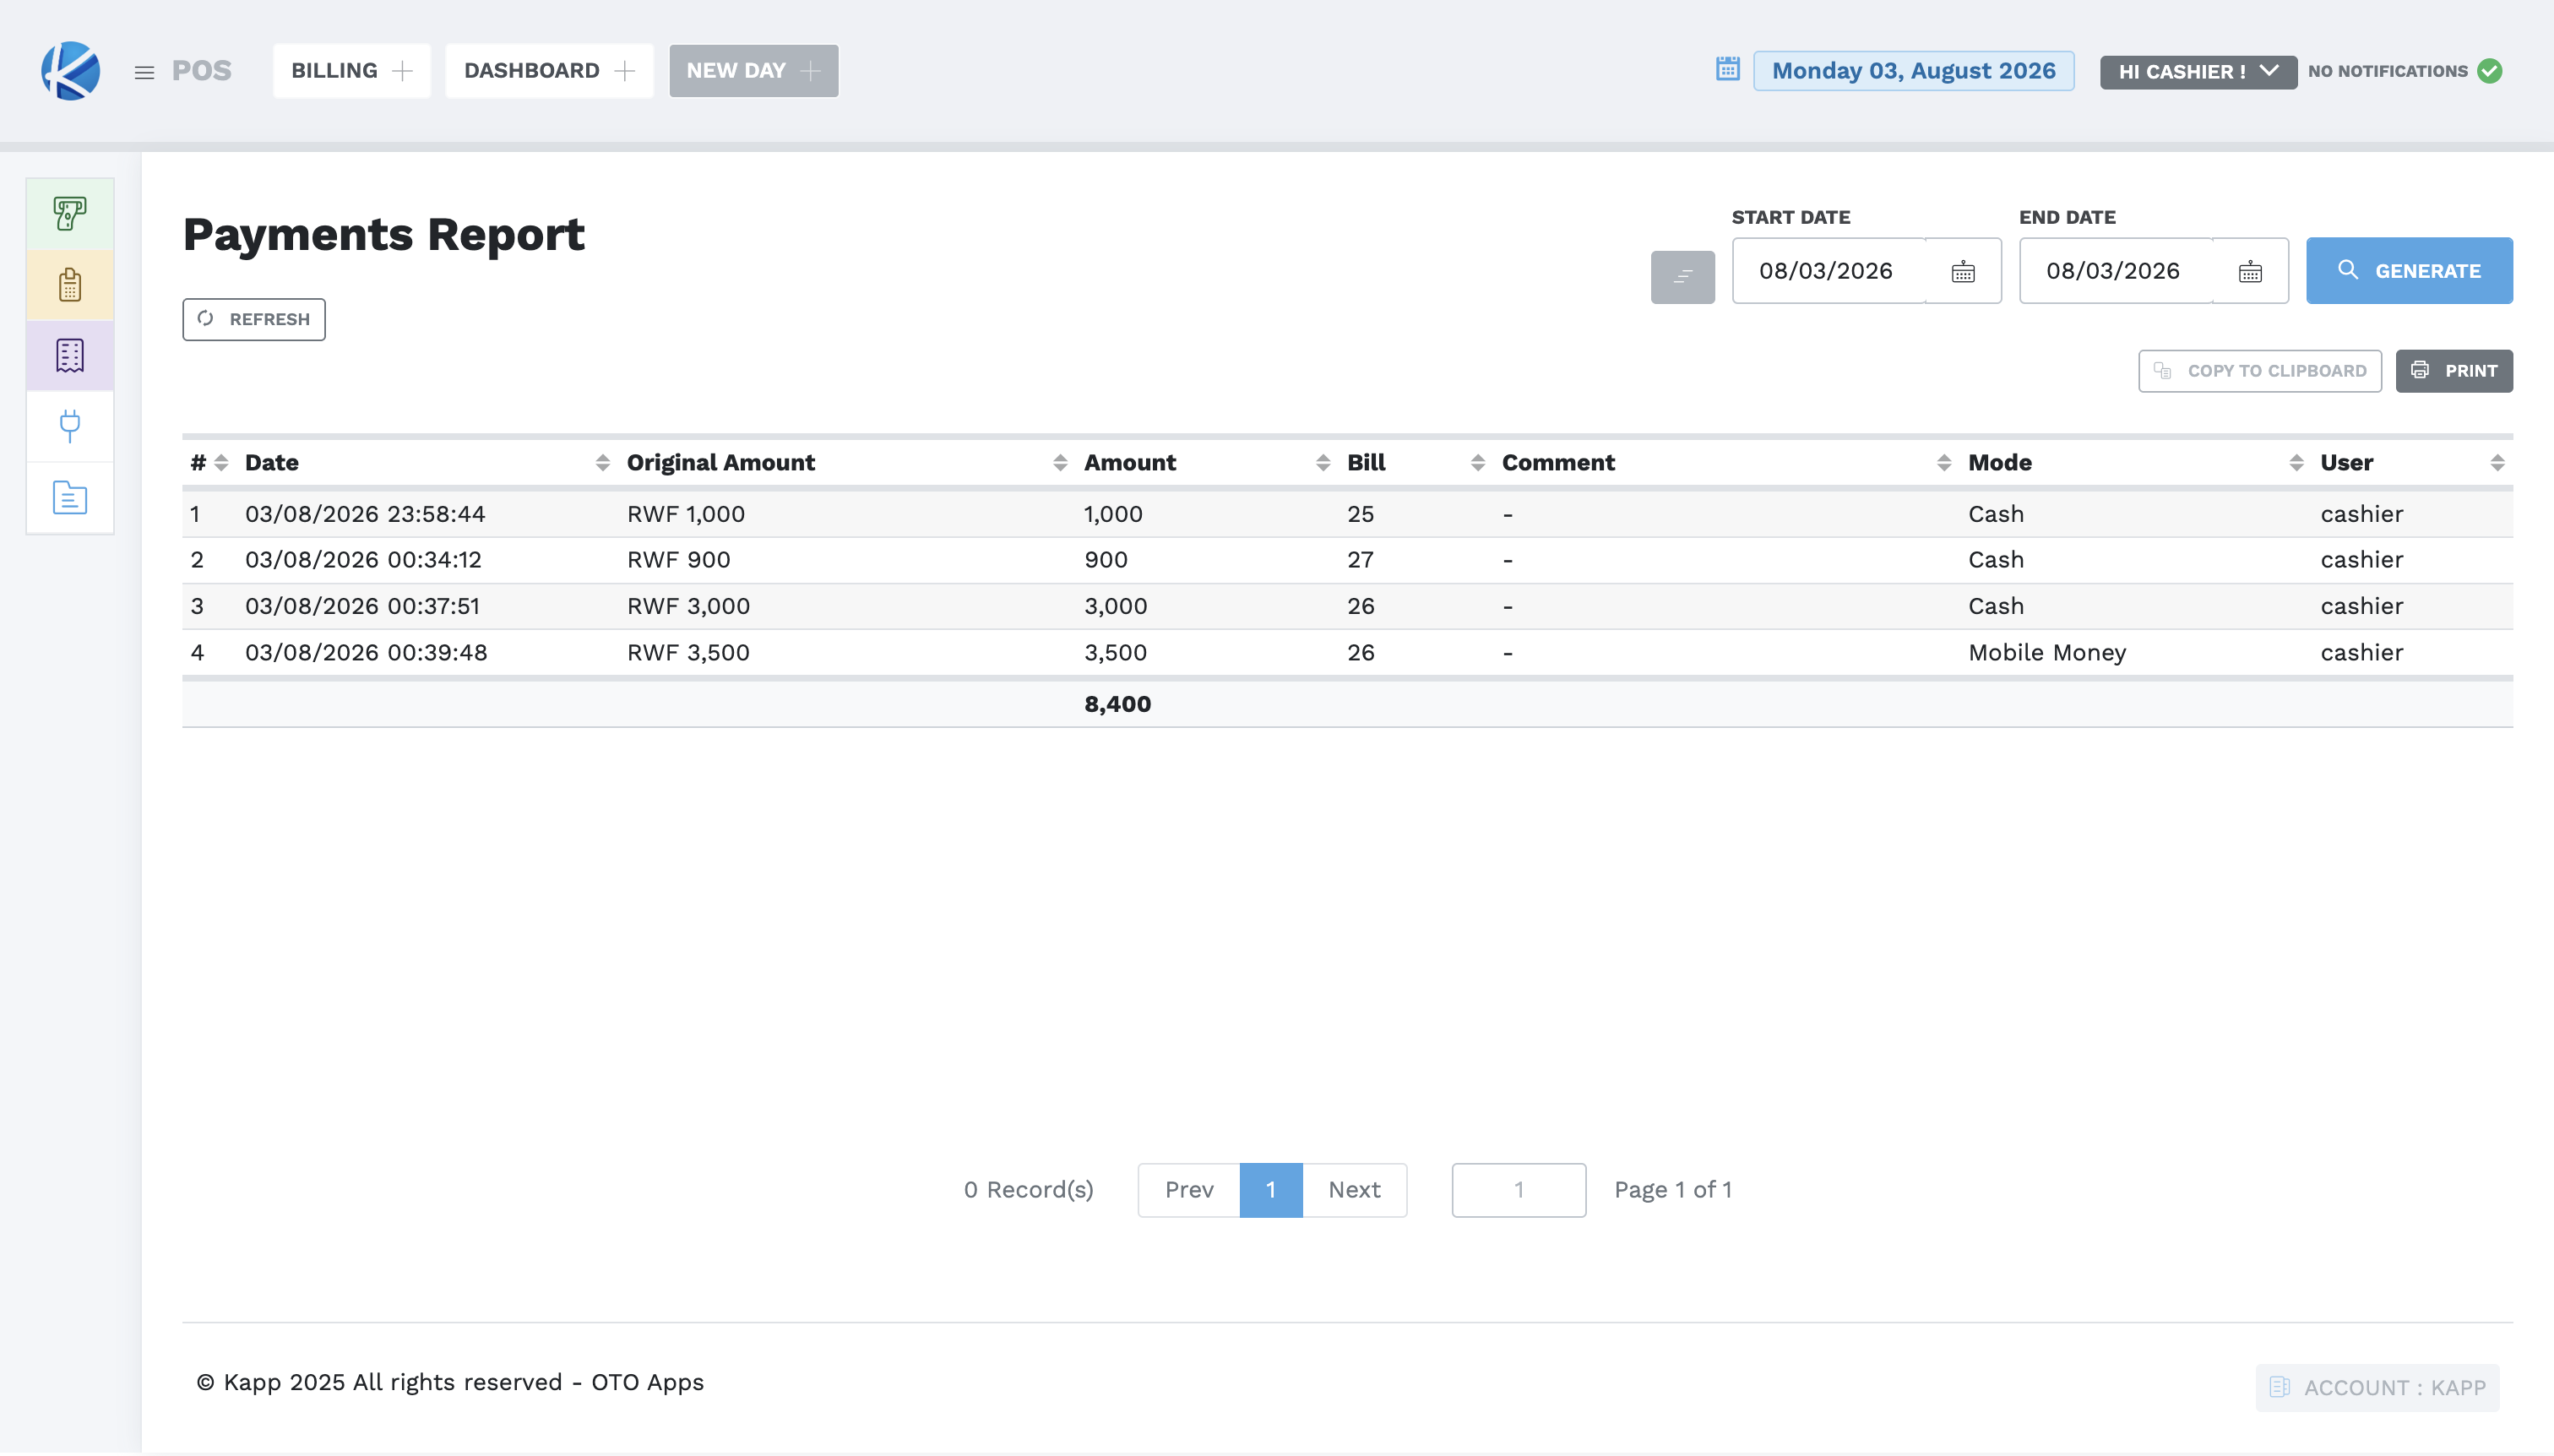
Reports → Payments: reconcile individual payment rows by bill ID, amount, method, and cashier. The sum must agree with Cashier Summary.
-
Use My Shift for bill-level review, including unpaid balances, but do not use it alone for tender reconciliation because it may not show every waiter-created bill collected by the cashier.
- Record every discrepancy by bill/payment ID and escalate before handover.
The Cashier may be able to see X Report but still be refused when selecting Generate. X/Z reports and NEW DAY belong to the authorized closing role under site policy; a cashier must not attempt to bypass that restriction.